
Listing photos are the first thing a potential guest evaluates — and in most booking decisions, they are the last thing too. Research by AirDNA consistently shows that professional-quality vacation rental photography tips put into practice are the strongest predictor of booking rate, outperforming price, reviews, and amenities in click-through impact. This guide gives you a complete framework to take high-performing vacation rental photos with the phone you already own.
Key Takeaways
Listing photos drive 65% of click-through decisions — more than price or review count
Natural light matters more than equipment; the best windows for shooting are 1 hour after sunrise or 2–3 hours before sunset
Every room needs a hero shot (wide angle showing the full space) plus a detail shot (close-up of a compelling feature)
A 30-minute declutter and staging session before you shoot produces more impact than any post-production editing
The exterior hero shot is the single most critical image — it determines whether a guest clicks into your listing at all
Houfy listings support unlimited photos; 20–30 images gives guests full story coverage without scroll fatigue
You do not need Lightroom or a professional photographer — light, staging, and composition are the only variables that matter
Equipment: Your Phone Is Sufficient
Modern smartphones (iPhone 12 and later, Samsung Galaxy S20 and later) produce listing-quality vacation rental photos in good light. What separates professional-looking shots from amateur ones is almost never the camera — it is the light, the staging, and the composition.
If you want to invest in one piece of equipment, a wide-angle lens attachment ($25–$60) for your smartphone gives you a wider field of view in small rooms and lets you show full spaces without distortion. It is the single most impactful affordable addition to a phone photography setup.
Three things to avoid: fisheye lenses (extreme distortion reads as deceptive to guests), portrait mode for rooms (blurred backgrounds look artificial in real estate photography), and flash (creates harsh shadows and makes rooms look smaller than they are).
For a deeper dive into phone-specific techniques, our guide to smartphone vacation rental photography covers camera settings and app recommendations in full.
When your listing is live on Houfy, you can upload and reorder photos at any time through your listing dashboard — so iterating on your photo set costs you nothing except time.
The Golden Hours Rule
The single most important vacation rental photography decision you make is when to shoot. Rooms look fundamentally different across lighting conditions, and natural window light at the right time of day is the most flattering, inviting source available — for free.
Shoot 1 hour after sunrise or 2–3 hours before sunset. During these windows, natural light is soft and warm, it enters windows at an angle that fills rooms without harsh shadows, and it creates the aspirational quality that drives booking clicks.
At midday, overhead light creates hard floor shadows and stark contrast against windows. At night, artificial lighting produces orange-yellow color casts that no editing fully corrects.
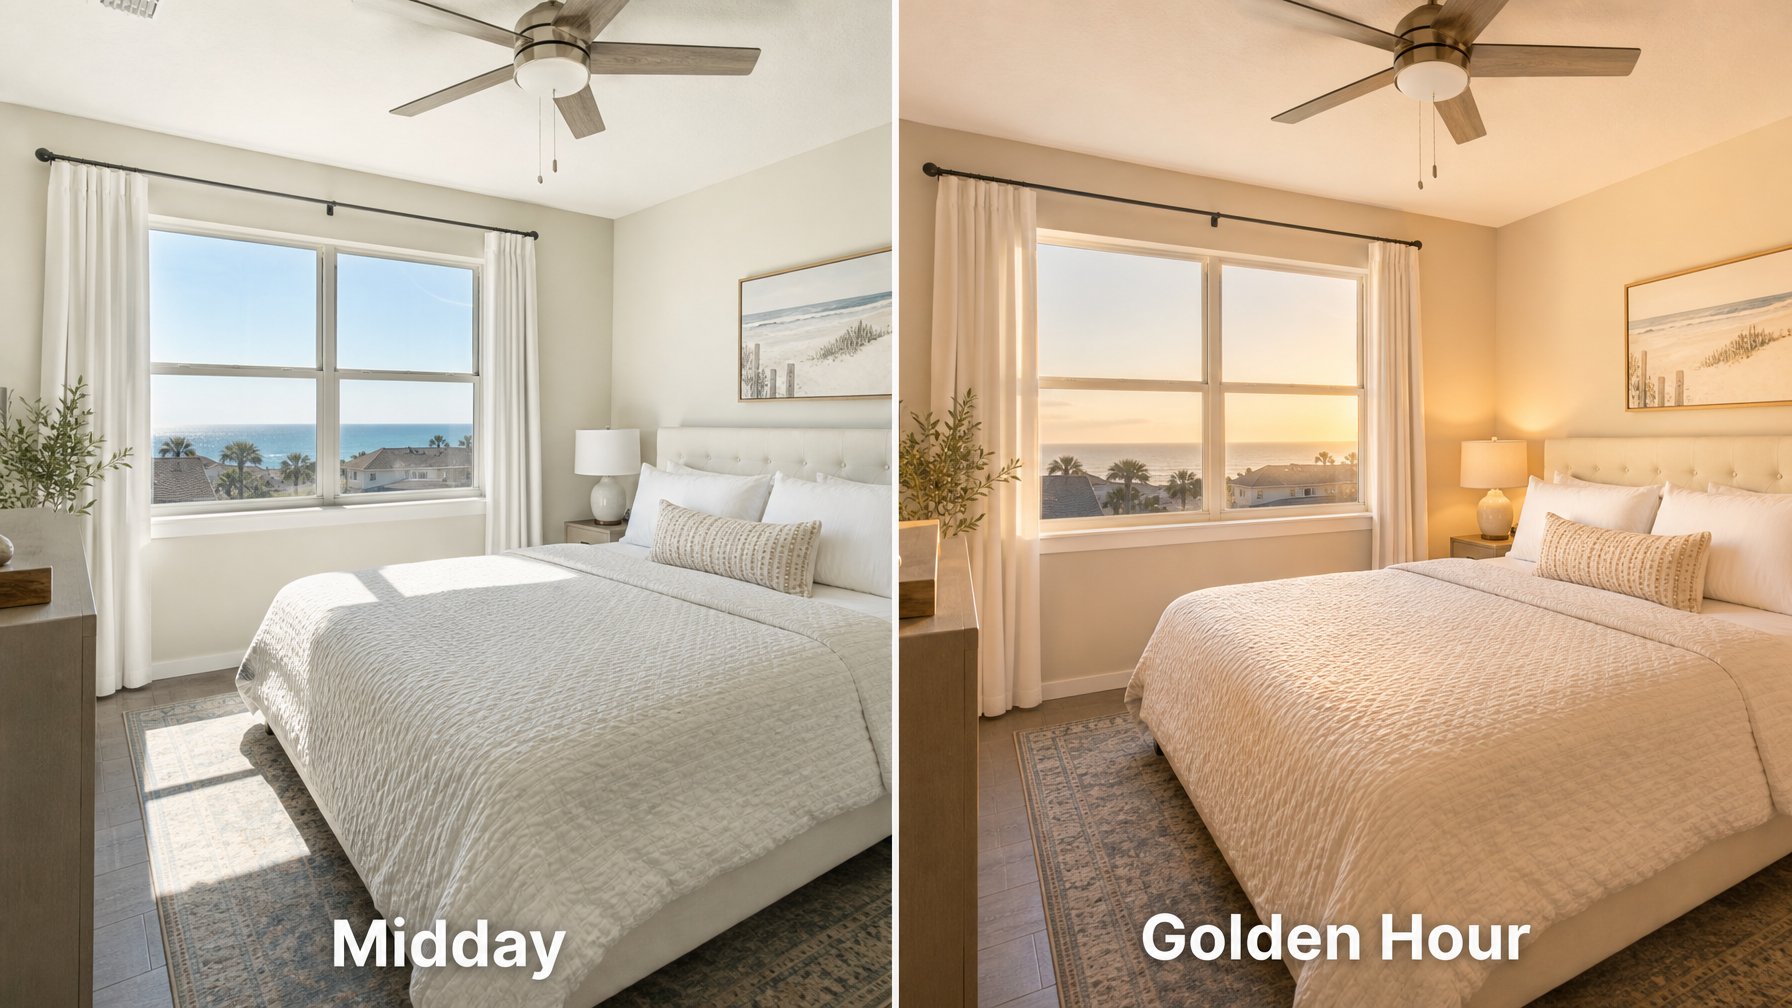
If your property faces east, shoot interior rooms in the morning. West-facing rooms photograph best in late afternoon. North-facing rooms with diffused skylight are the most forgiving — they shoot well throughout most of the day.
Room-by-Room Shot List
Use this checklist for every property shoot. Each room needs a minimum of one wide establishing shot and one detail shot.
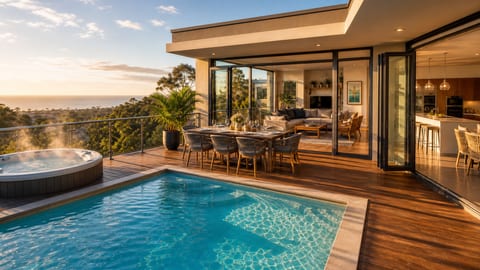
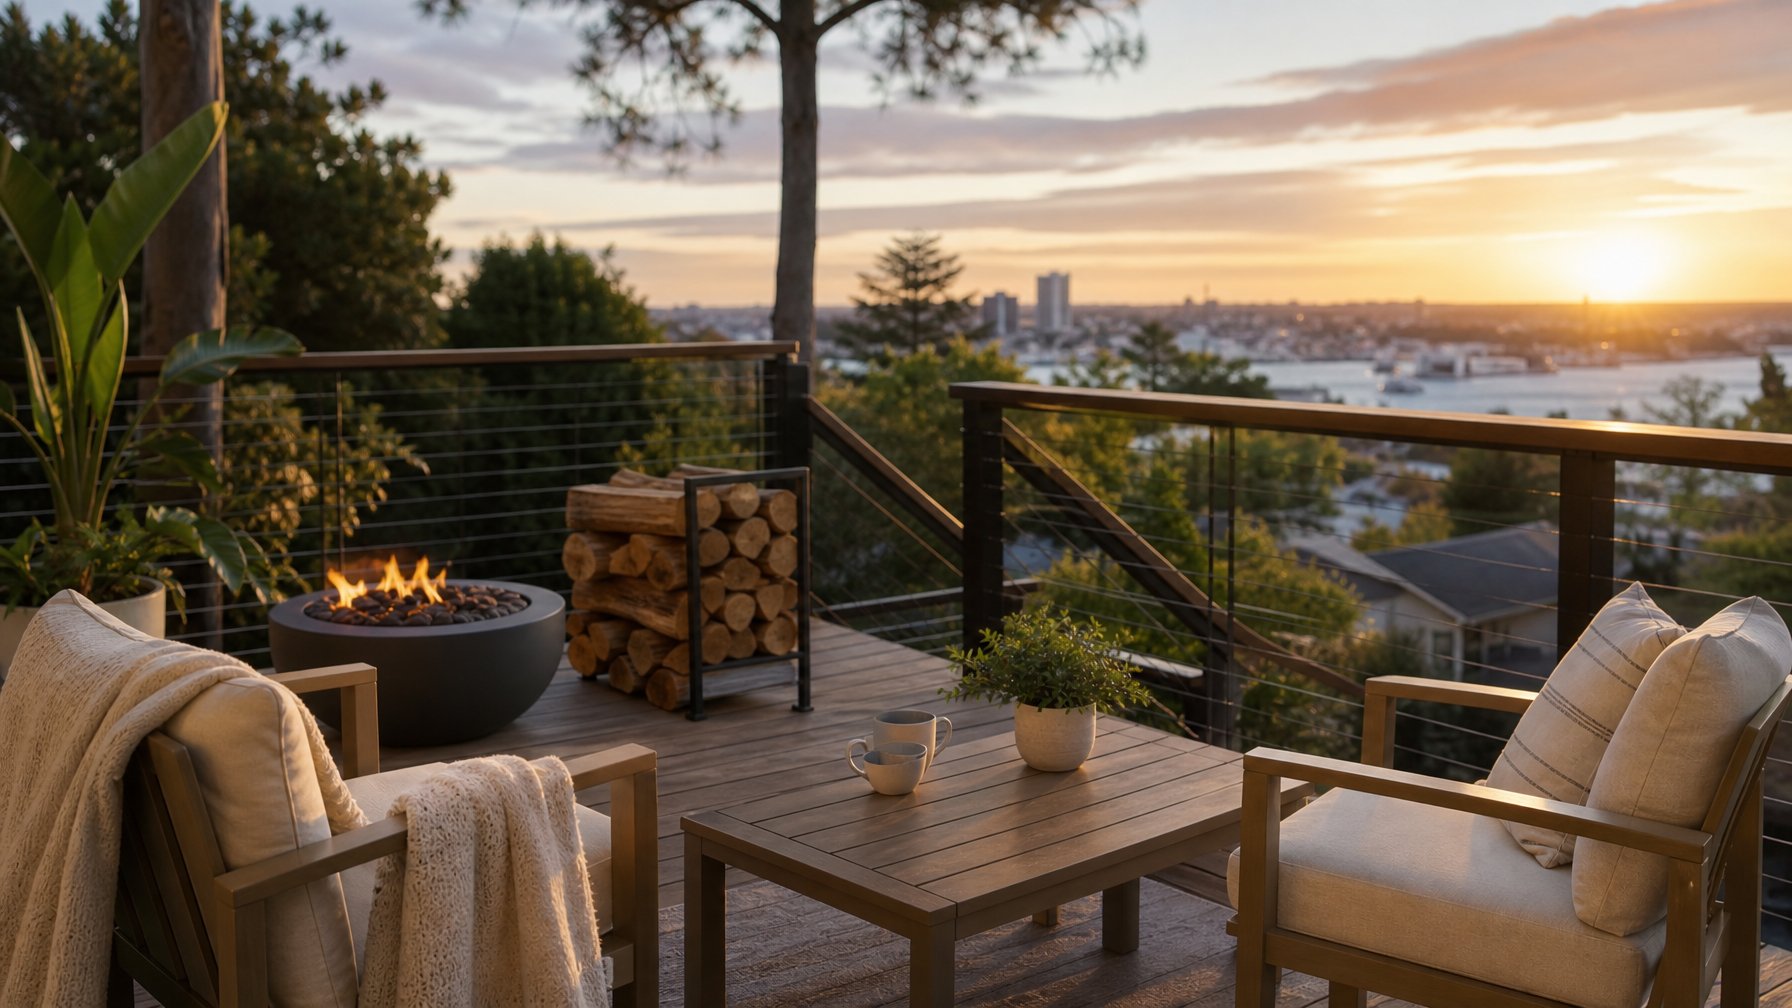
Exterior (most important shot): Step back far enough to show the full property. Include the driveway or entry approach. Shoot during the golden hour — curb appeal photography is dramatically stronger in warm light. If there is a view, a pool, or a distinctive outdoor feature, photograph it from an angle that includes the house in frame.
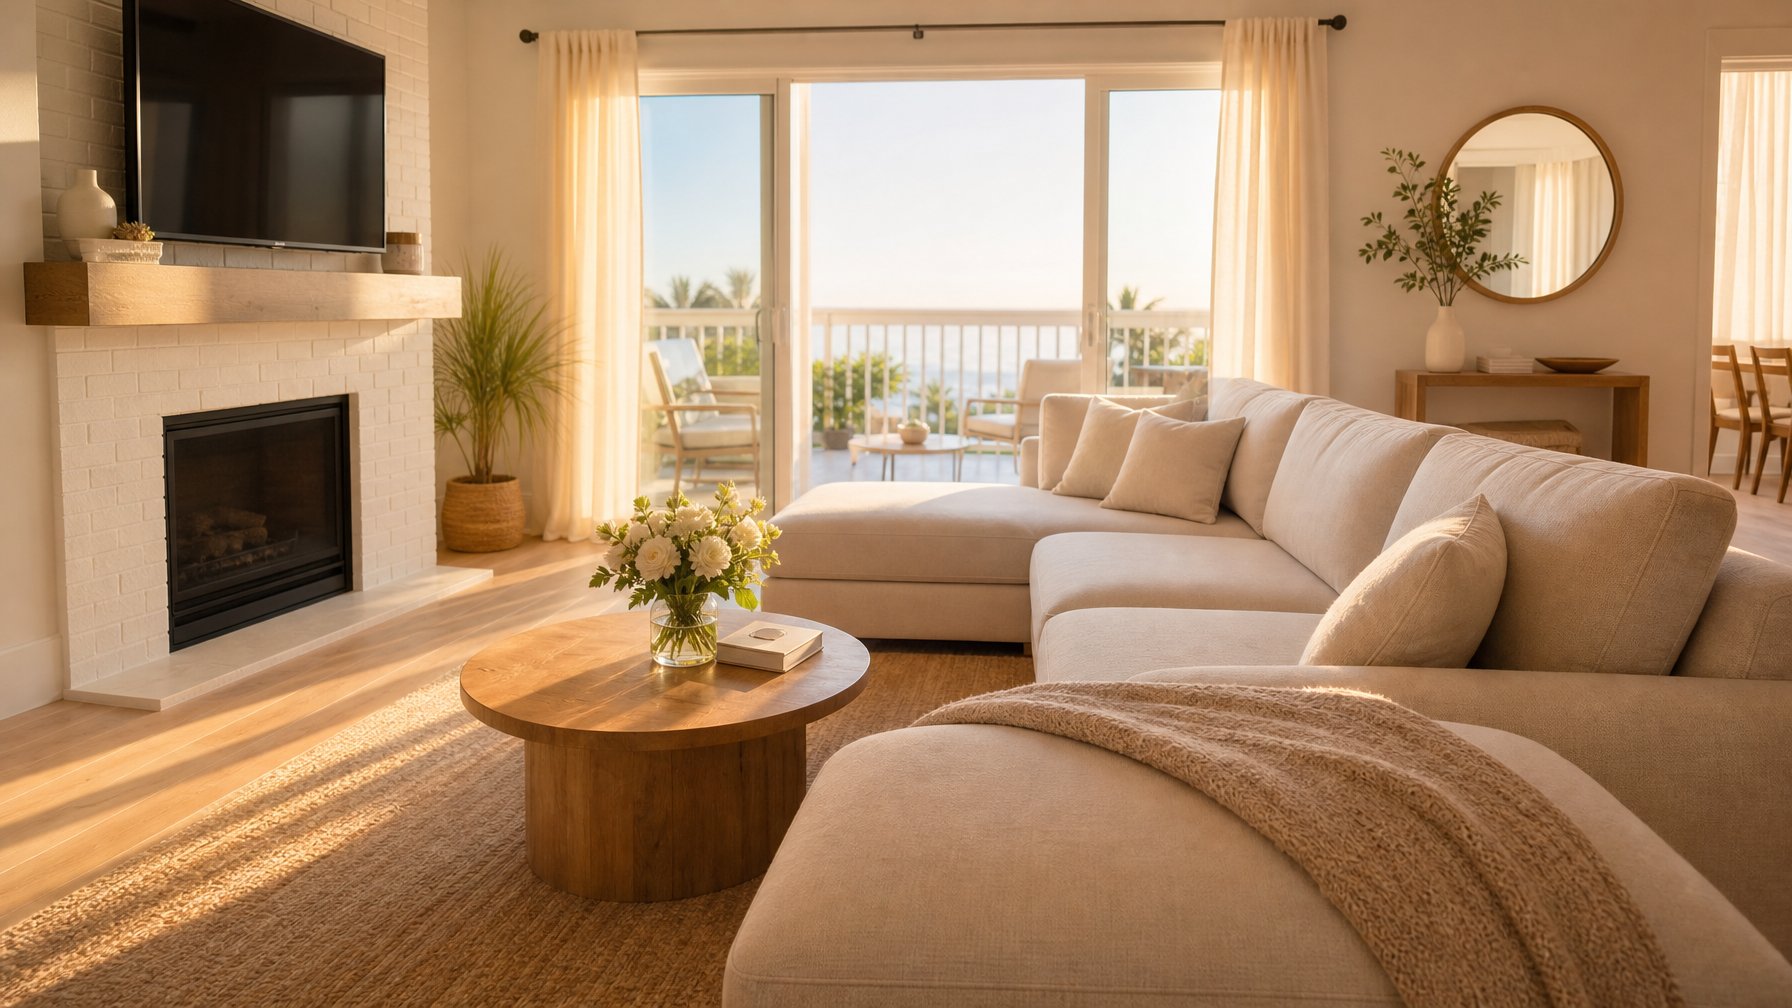
Living room: Wide shot from the corner showing the full space. Detail shot of the focal point — fireplace, view window, distinctive furniture. Include any screens, board game collections, or entertainment features that signal relaxation.
Kitchen: Shoot from the corner with counters cleared and appliances visible. A coffee maker, quality cookware, and a fruit bowl signal "well-stocked." Overhead kitchen light is often unflattering — open blinds and use window light whenever possible.
Primary bedroom: Shoot from the doorway at a slight angle showing the full bed and natural light. Make the bed to hotel standard — pillows stacked, duvet smooth. Include the view window if one exists.
Bathroom: Fold towels and display them. Close the toilet lid. Remove all personal products. Shoot from the doorway at eye level with the light on and the window open if available.
Outdoor spaces: Stage the deck or patio as if guests have just stepped outside — coffee mugs on the table, chairs angled invitingly toward the view. A fire pit with firewood stacked nearby is one of the strongest outdoor detail shots a listing can have.
If you need guidance on how to structure your full listing beyond photos — description, pricing, amenities — Houfy's listing optimization resources cover the complete approach.
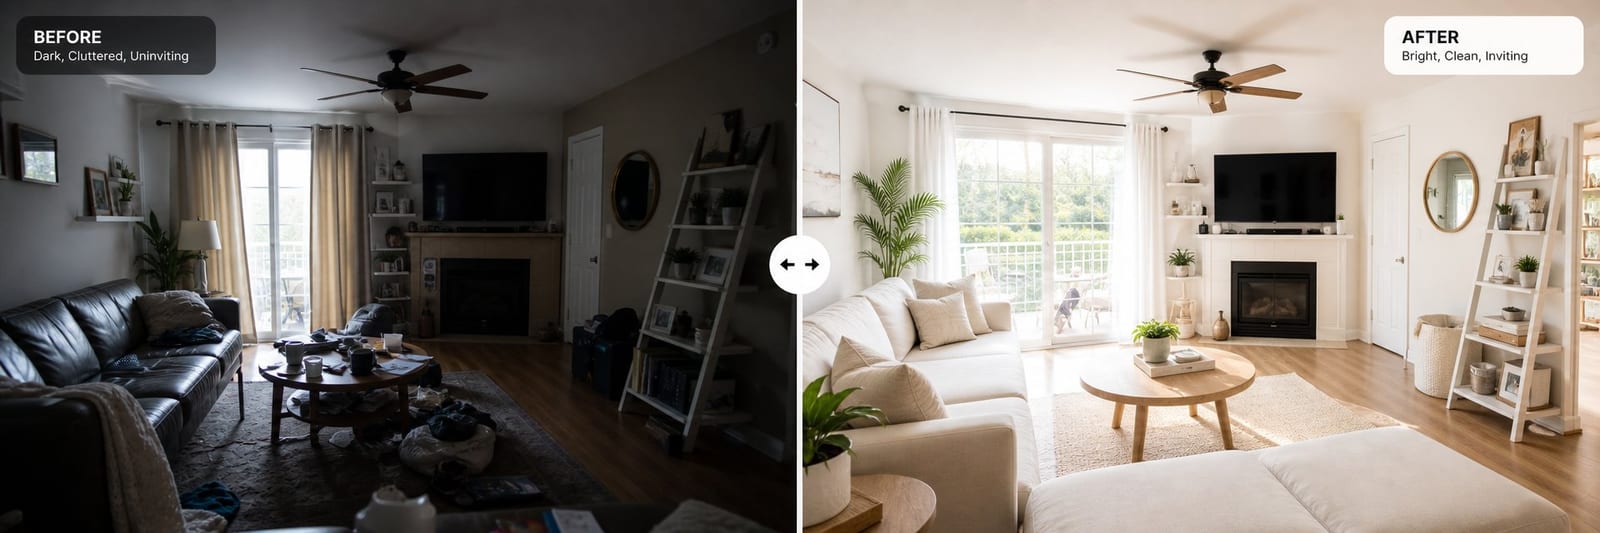
Staging Before You Shoot
Photography cannot fix a cluttered, over-furnished space. A 30-minute staging session before shooting produces more booking impact than any amount of post-production editing.
Remove: personal items and family photos, excess decorative objects, items on countertops (appliances, mail, toiletries), and anything that makes the space feel occupied rather than ready for a new guest.
Add: a simple bouquet of fresh flowers, a bowl of fruit in the kitchen, a throw blanket draped over the sofa, books arranged on the coffee table, and fresh white towels folded on the bathroom counter.
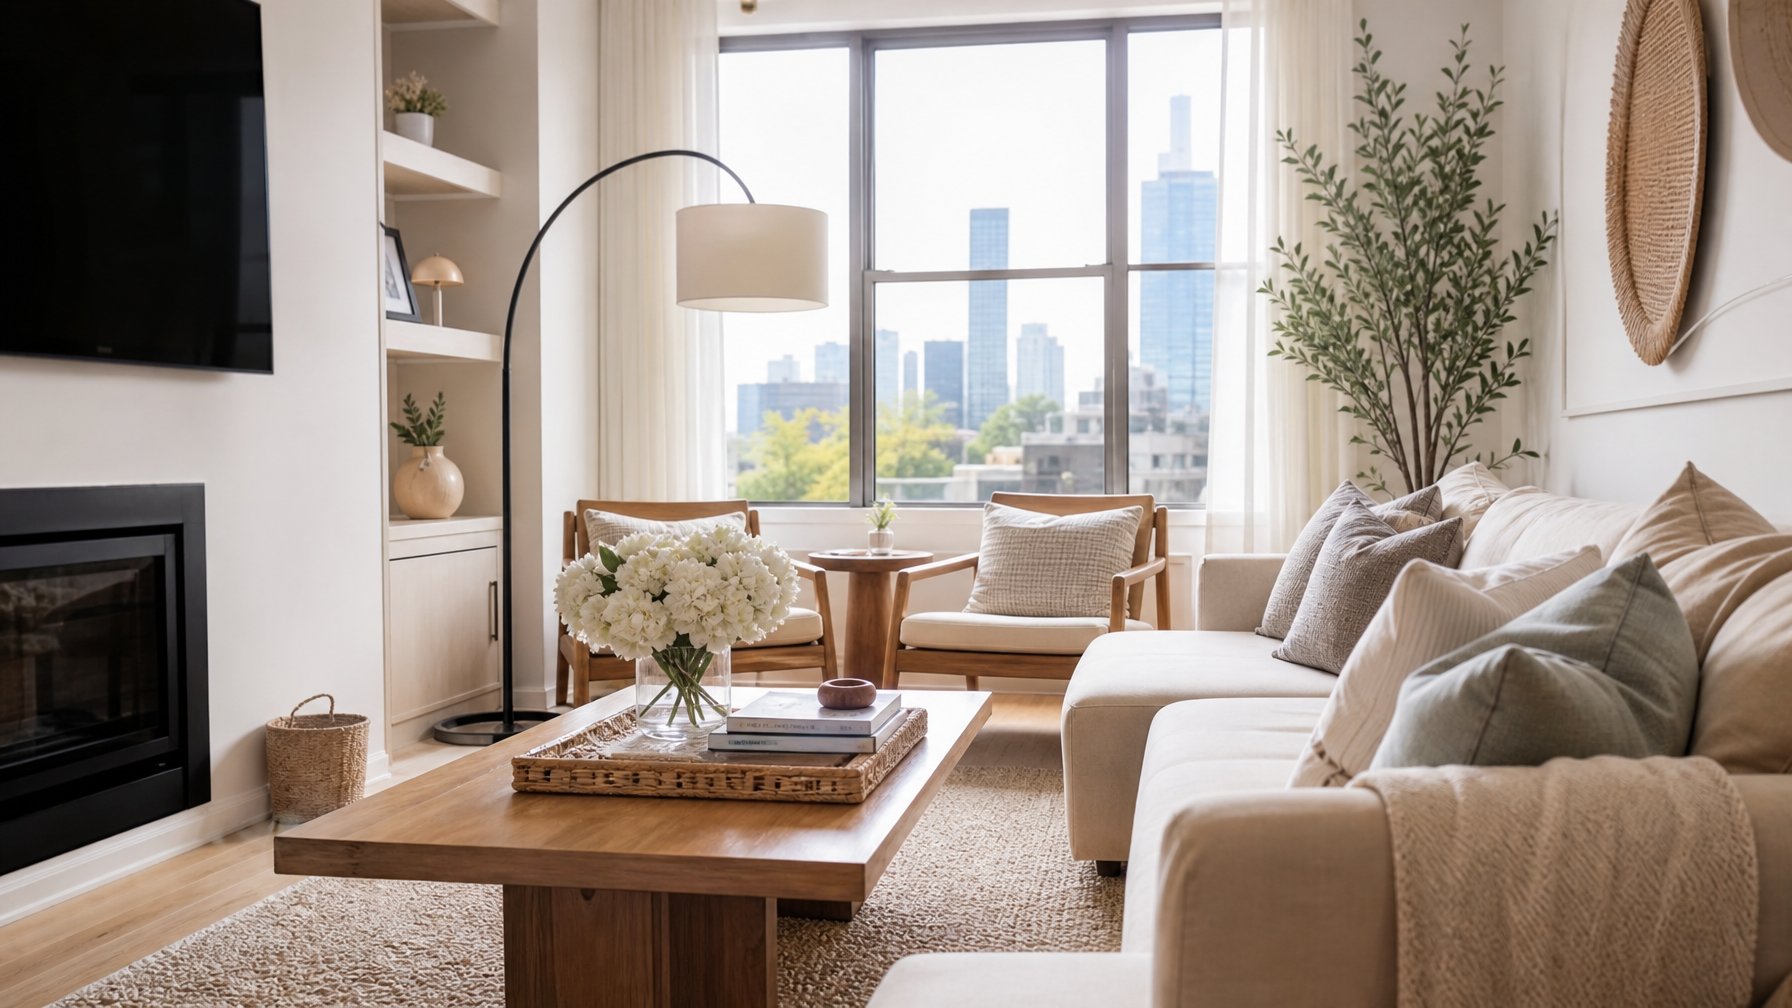
The goal is a space that reads as "clean, welcoming, and ready for me" — not as "someone else's home." That psychological shift is what drives a click into an inquiry.
If you want a quick-reference checklist format, our post on 8 secrets to vacation rental photography is a good companion read.
List your property on Houfy for free — once your photos are ready, your listing can be live within minutes, with no booking commissions taken.
Bedroom Photography: The Trust Shot
The primary bedroom is the second most-viewed image in any listing, after the exterior hero. Guests are evaluating sleep quality, cleanliness, and comfort in a single frame.
Shoot from the doorway at a slight angle — this maximizes the sense of space and shows the full bed and at least one window in the same frame. Make the bed with hotel-level precision: crisp duvet corners, symmetrically stacked pillows, no wrinkles.

Remove everything from nightstands except one lamp and one small decorative item. If the room has a view, include it. If the room does not have a view, fill the frame with the bed and let the light do the work.
Understanding what guests actually look for in a 5-star vacation rental helps you prioritise which rooms deserve the most staging effort.
For hosts building a full direct booking strategy on Houfy, strong photography is the top-of-funnel asset that makes every other optimization effort worthwhile.
Editing: The Minimum Viable Adjustments
Shoot in good light with good staging and your editing needs are minimal. Three adjustments account for 90% of the improvement most listing photos need:
Brightness: Raise by 10–15% if the room is slightly underexposed.
White balance: Warm up slightly if the room feels clinical or cool-toned.
Straighten: Ensure horizontal lines — table edges, window frames, countertops — are perfectly level. Tilted lines read as careless and unprofessional.
Free tools — Apple Photos, Google Photos, and Snapseed — perform all three adjustments adequately. Lightroom and Photoshop are not required for listing-quality results.
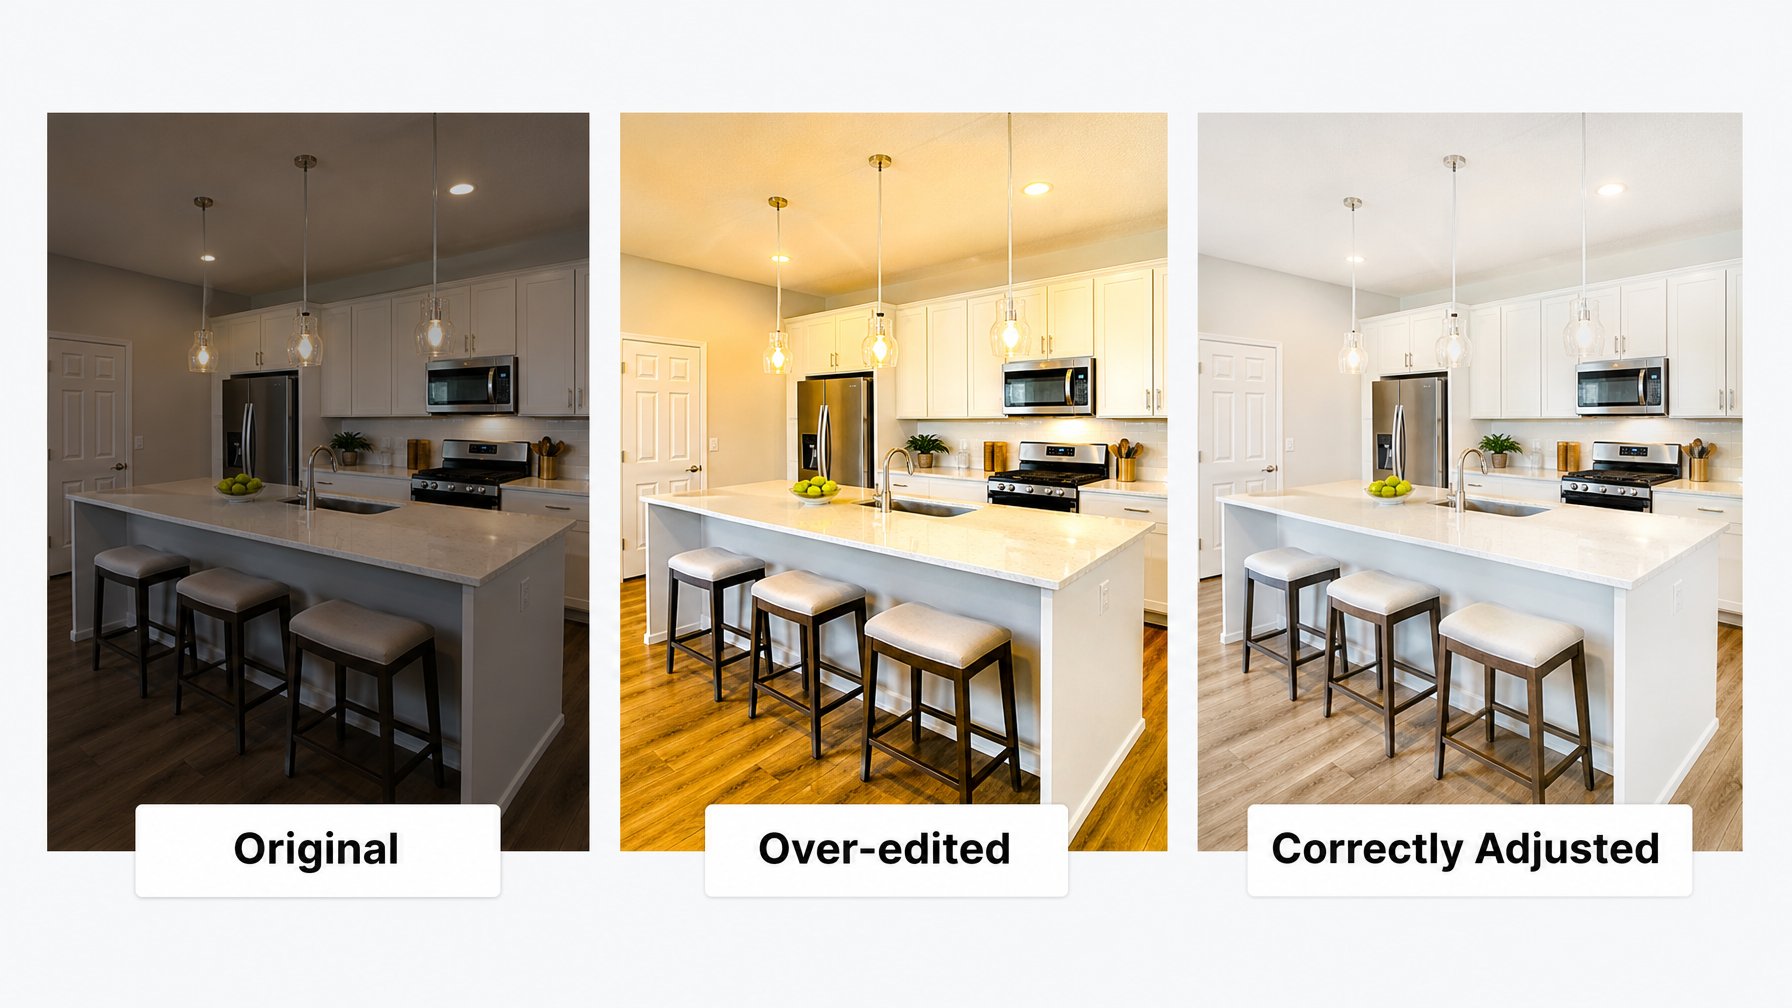
Three things not to do: increase saturation excessively (colors look fake), apply heavy filters (dates photos badly), or edit out physical features of the space. Misrepresentation creates the expectations gap that generates negative reviews — the opposite of what great photography is supposed to achieve.
Houfy's listing optimization category covers description writing, pricing strategy, and amenity presentation that complement your photography investment.
How Many Photos Should a Vacation Rental Listing Have?
20–30 photos is the optimal range for a standard vacation rental. The research basis for this: listings in this range see the highest click-to-inquiry conversion. Below 12 photos raises guest suspicion. Above 35 photos creates scroll fatigue and buries the strongest images.
For a typical 3-bedroom property, the breakdown looks like:
Exterior: 2–3 shots (front, back/pool, view if applicable)
Living room: 3–4 shots (wide establishing + details)
Kitchen: 2–3 shots
Each bedroom: 2 shots each
Each bathroom: 1–2 shots
Outdoor/amenity spaces: 3–5 shots
Neighborhood/surroundings: 1–2 if compelling
Once your photo set is complete, pair it with a vacation rental description that ranks and converts — the two work together to drive both clicks and bookings.
Add your listing to Houfy today — upload unlimited photos, set your own terms, and keep 100% of what guests pay. No commission, no algorithm controlling your ranking.
Frequently Asked Questions
Should I hire a professional vacation rental photographer?
If your budget allows ($150–$300 for a local real estate photographer), a professional will typically produce better results. However, a host who applies these vacation rental photography tips carefully — using natural light, staging properly, and shooting at the right time of day — will outperform a mediocre professional working in poor conditions. The techniques in this guide remove the gap between professional and phone photography in most situations.
Can I use a wide-angle lens to make rooms look bigger?
Yes, within reason. A 24–28mm equivalent focal length is standard for interior real estate photography and presents rooms accurately. A true fisheye lens (14mm equivalent or wider) creates unnatural barrel distortion that guests immediately recognize as misleading. The goal is to show the room accurately and attractively — not to make it appear larger than it is.
What is the best time of day to photograph a vacation rental?
1 hour after sunrise or 2–3 hours before sunset. These golden hour windows produce soft, warm, directional light that fills rooms without harsh shadows. Midday light from overhead creates flat, harsh shadows. Shoot east-facing rooms in the morning, west-facing rooms in the afternoon. North-facing rooms with skylight are the most forgiving throughout the day.
How many photos should a vacation rental listing have?
20–30 photos covers a full property story without creating scroll fatigue. Cover every room — both interior and exterior — with at least one wide shot and one detail shot per space. Include standout amenities like a hot tub, view deck, or game room as dedicated shots. Houfy listings support unlimited photos.
Do vacation rental photos affect search ranking?
Yes, directly. Listings with stronger click-through rates rank higher in search results across booking platforms. Since listing photos are the primary driver of click-through rate, better photography improves both conversion (guest books) and distribution (listing gets seen). On Houfy, there is no paid placement or algorithm that demotes non-advertising listings — every optimization you make to your photos directly benefits your visibility.
What editing app should I use for vacation rental photos?
Snapseed (free, iOS and Android) is the best all-around tool for hosts. It handles brightness, white balance, and perspective correction — the three adjustments that matter most — with a simple interface. Apple Photos and Google Photos are adequate for basic corrections. Lightroom Mobile (free tier) is useful if you want to save preset edits and apply them consistently across a full photo set.
Source Citations
AirDNA — Listing Photo Impact on Bookings and Click-Through Rates — https://www.airdna.co
Airbnb Photography Resource Hub — Best practices for host photography — https://www.airbnb.com/resources/hosting-homes/a/taking-great-photos-of-your-space-1
Vrbo Partner Central — Listing Photo Guidelines — https://www.vrbo.com/en-us/p/host-tools/listing-quality
Houfy currently has 97,000+ verified listings across 50+ countries.
Last Updated: June 17, 2026